Friday, May 23, 2014

Restoring Myself

Friday's Sunset
The weather outside is great for Florida in May, the sun is out with few clouds, the humidity is low and the temperatures were in the mid-60's this morning.  So why am I inside, typing on the computer?  I am restoring myself.
Somehow, I cut my toe and it hurts to walk on it.  Since walking is what I do, I decided to sit back and let it heal, and not make it worse by hiking on it today.
I did some household chores and took my wife out for a short day trip and we enjoyed fish tacos outdoors. Yes, I walked a little, but I really enjoyed myself.  By slowing down and not pushing to check off everything on my to do list in the scant daylight left to me, I can enjoy some peace, and even be surprised at what I do find.
A nice break at a trail head.
On Saturday I rode my bicycle along the Seminole-Wekiva trail for 16 miles and spent the rest of the day watching movies.  Nice and relaxing!
Hopefully, I'll be able to walk better next week, maybe even ride my bicycle again, take some more photos and just enjoy being outdoors.
Next weekend, I will be back outdoors again, shooting video and having a blast!  And feel renewed because I spent some time restoring myself.  Isn't life grand?
A mom Raccoon with 2 babies along the trail

Friday, May 16, 2014

So I hiked along the Econlockhatchee River in the Little Big Econ State Forest last week.  The forest is north east of Orlando and this trail follows in an east-west direction from the Barr Street trailhead to Snowhill Road.  Both the Little and Big Econlockhatchee Rivers are in this forest, and the trail passes along both of them.  I hiked a little more than three quarters of the way out and back.  As I mentioned in a previous post, I shot video along the trail using my Ultralight Filmmaking equipment and iPhone 5C.
The weather was hot, nearly 96 degrees.  The sky was mostly clear and there was a light breeze, which made the hike bearable.
Even though it was hot, I had an excellent time!  I was so busy setting up shots and making camera moves that the time just flew by, and I actually ran out of time to finish the hike.  Also I ran my camera battery down to 17%, using the FILMIC PRO App, so I had to shut my phone off on the return trip to conserve power for an emergency phone call in case I needed to make one.  The next time I'll bring my Solio Bolt backup battery.
And the trail was excellent!  Traffic noise died down pretty quickly and I didn't hear anything mechanical except a couple boat motors in the distance and an occasional airplane overhead.  A lone trail runner guy passed me twice, but that was it for people outdoors.  I really enjoyed walking by the river.  The trail was well-marked, the bridges were in good shape (can be an issue in super-humid Florida), and there was lots of wildlife.  I did come across a large turtle, found some cardinals flitting in a bush, followed squirrels along tree branches and heard lots of splashes in the water and bird whistles in the air.  
I got into the rhythm of setting up, practicing a move, getting the shot and moving on.  I did miss not having wide angle, macro or telephoto lenses for some shots, but I will get them later.  I missed having full manual control over the camera like I used to use, but the video came out fine.  I didn't use the lavaliere microphone yet, but that will come soon.
When I returned home and recharged the batteries, I loaded the clips into the iPhone's camera roll, opened Adobe VideoBite and began editing.  After a few minutes I was intuitively using the App, trimming and dragging clips around.  It was cool to edit within the phone.  It was very, very easy and it is very, very limited.  But I do like how it came out.  The finished product is below, and it gives you a feeling of what it is like to hike this trail.  I hope you enjoy it.
On my Facebook page Lite Packer Lifestyle, there is a shorter version of this video.  Facebook limits you to two minutes for your video, You Tube does not.  Plan on seeing more videos from me in the future.
Many years ago in a previous life I was a TV news photographer.  I really liked what I did, I was respected by my peers and I was welcomed to work on the other side of the crime scene tape daily.  Though I am many years out of practice, I felt a little bit of that goodness today, and it was wonderful!

Friday, May 9, 2014

Ultralight Filmmaking Hike

Map of the Econlockhatchee River
Since last weekends weather was exceptionally wet,this will be my first weekend to shoot video and stills outdoors with my iPhone.  I'm really looking forward to getting out, even though the temperatures will be in the mid to upper 80's.  I may go toward the Econlockhatchee River which is just a few miles from my home, but I'll make that decision in the morning.
My plan is to hike and document flowers, foliage and wildlife along the way in both video and still photos.  Shooting along water would also be nice.  I won't hike very far, the idea is to spend most of the time capturing the outdoors digitally.
When I return home, I'll begin to edit these video clips and photos into a few short videos on my iPhone (if they are any good) to post on Facebook and this blog.  I'll write a brief word or two on editing with Adobe Videobite once I use it.  It is a free app I downloaded.
Tripod on backpack ready to go
Here is a photo of the new Tiffen Fusion tripod attached to my day pack for a day shooting video outdoors with my iPhone 5c.  It weighs a little over 3 pounds 7 ounces and works very well to shoot smooth pans and tilts.  Mounting the iPhone to hold it steady is critical to getting good videos and photos, and is just as critical as having good lighting.   Since I'm shooting outdoors there should be no issue with the latter.
Tripod mount at 8.8 grams
The iPhone mount I purchased is also lightweight and so far under test has held my camera very securely.
My years of media experience will have me record voice-over audio on site, on camera.  I'll be using my new Audio Technica lavalier microphone for all voiced shots.  Wild and natural sound will be captured from the built-in camera microphone unless there are noise or wind issues.
I may look a bit weird with headphones and a microphone clipped on with the tripod suspended from my pack and my iPhone in a case on my waist, but I have looked much weirder and heavier before when working in the media industry.  This time I will be shooting video for myself.


Friday, May 2, 2014

Ultralight Filmmaking

iPhone 5C

I have been assembling camera pieces over the past few weeks to record videos and shoot photography outdoors with my new iPhone 5C.
My older Cannon Vixia HF R20 video camera weighs over 10 ounces, so the i-Phone is currently the best bet at 3.95 ounces for carrying a lightweight camera that also shoots HD video.  It is also a better camera choice for stills since it has an 8 megapixel camera (Canon = 3MP).  There is also the fact I can edit and post videos using the cell phone, something else I cannot do with only the Canon camera.  Plus GPS, maps and all the other fun apps that can make life seem a little easier.
Some of the apps I will be using include Filmic Pro for shooting video and Adobe VideoBite for video editing on the iPhone.  For photography I have been looking into the Camera+ app and a few others.  I will download other photographic and film-effect apps over time.
If you have any question about using an iPhone for making a professional quality video,  watch this film onlineYou will see what I mean.
Tiffen Fusion fluid head tripod

To improve the photo and video quality I have also purchased a fluid-head tripod (think smooth moves), a tripod mount with a unipod handle for light hand-held work, and an Audio Technica lavalier microphone for recording quality audio tracks and interviews.
The weights:
Tripod - Tiffen Fusion, 3 Pounds, 7 ounces.   I could not find a lighter weight fluid head tripod.  Most weigh 7 pounds or more.
Mount - First2Savv tripod mount.  No weight given, but expected to be around 12 ounces with the unipod handle.
Microphone - Audio Technica ATR-3350 lavalier mic, .02 ounce.  Plus a couple spare button-size batteries.
There is also an audio converter cable with both mic and headphone jacks at about .03 ounces.
This is a good start and I'll be looking to get Olloclip lenses and will be testing different mounts like SteadyCam as I go.
For hiking and backpacking, the tripod hooks onto my daypack or backpack easily, and the iPhone  lives in its belt case.  The microphone gear stays in a small waist pack or the backpack belt pockets. 
It is all very lightweight, and some parts are Ultralight.  It all gives me the power to create quality hiking, backpacking and travel videos & photos without having a lot of stuff to carry.  I believe the total rig will only add about 4 pounds to my current 9 pound base weight when backpacking.  That's far less than my 11 pound Nikon and lenses.
BTW - I call it "FILM MAKING" because I am old school.  I started with a 35 mm camera at 10 years old, studied in the film program in college and have worked in various media and television industries for about 40 years.  My Filmmaking life is much like Ultralight backpacking, where the most important stuff you use is in your head.
Watch for upcoming short videos on this blog, on the Lite Packer Lifestyle Facebook page and on a new You Tube Channel coming soon!

Friday, April 25, 2014

Summer Ultralight Day Hiking

2014 REI Flash 18
Here are some quick ideas to lighten your load for summer day hikes.
Day pack.  You can find an Ultralight and load-worthy day pack that carrys about 20 liters and weighs only 10-12 ounces.  I use an REI Flash 18, but I also like the Flash 22 since I can carry water bottles in the side pockets and the first aid kit in the top pocket.  Both packs swallow everything I can think of to carry, including my 10 essentials, lunch and a stove & cup for on-trail java.  There are many other Ultralight backpacks out there, just remember the size of about 20 liters and 10-12 ounces in weight.  Don't forget to weigh everything!
For water bottles, I alternate between a 2 liter Platypus water bladder, and 2 lightweight Gatorade 32 ounce/1 liter bottles.  While I prefer the straight-sided 32 ounce Nalgene bottles because they fit better going in and out of backpack pockets, they weigh too much for me at 6.2 ounces each for the Lexan bottles and 3.5 ounces each for the poloyethylene Nalgene bottles.  32 ounce Gatorade costs about a buck a bottle new, and when emptied the bottles weigh 1.8 ounces/52 grams each.  Be sure to tell your significant other not to toss them with the trash!
I also wear trail running shoes, the Montrail Mountain Masochist, which are very lightweight at one pound each, and are very comfortable.  They also grip anything you walk on.
My clothes are always nylon and polyester, usually long pants and a long sleeve shirt over a T-shirt, and a hat which protect me from the sun and wind.  They even help keep the mosquitoes at bay.
The 10 essentials in my pack include:
1. First aid kit.
2. Headlamp.
3. 2 liters water, Sawyer water filter.
4. Shelter including thick & thin rescue blankets & Marmot Precip rain jacket.
5. Fire starter (lighter, matches, lint).
6. Compass & trail map.
7. Spares, pocket knife (includes emergency reflector disk).
8. Sun screen & sunglasses, bug spray.
9. Food, Esbit stove/pot/mug/spoon.
10. Warm shirt/sweater/hat/gloves/pack towel.
You can check out REI's updated 10 Essentials list here.
All of this weighs just under 10 pounds, with 4 pounds of that being water (@ 2 pounds/liter).  It is so light, I don't even notice I am carrying a pack while hiking.  It feels natural and normal, and I always have everything I could possibly need for safety.
Occasionally I will carry an additional liter of water if I am hiking in dry country and I always carry a little extra food, just in case.  Spares include another way to start a fire, extra batteries, spare mini flashlight, water purification, and sewing and maintenance kits (listed HERE).
If I had to spend a night out, I could, though it would be uncomfortable.  I would be warm enough and protected from the wind and rain.  I could fashion a tarp for shelter, cook something to eat & drink, build a fire if needed, wrap up for warmth or signal for help.
This is partly why hiking or walking in the woods is so comfortable for me.  I have learned what I need to know to be safe, and I carry myself lightly on the earth.
The other part is that I just love being outdoors.  I really love it!

Friday, April 18, 2014

Under $350 Ultraight Backpacking Kit

For simple overnight backpacking trips, you can easily put together an Ultralight Backpacking kit that costs around $350 and one that weighs MUCH lighter than the backpacking kit listed recently in Outside magazine
I have been asked several times to put together an Ultralight Backpacking kit that costs XX dollars for so and so.  Here's my attempt at assembling one for around $350, about what any hobby starts at.
First buy or borrow a postal scale that weighs pounds, ounces, and grams so you can know your equipment's actual weight.  Everything but the food listed here is available online.
Lets start first with the Big Three, the pack, tent and sleeping bag.
Pack - Go Lite Jam 35 costs $99.99, weighs 1 lb, 11 oz @ Go Lite.com.  35 liters is the correct size for overnight backpacking trips IF you carry lightweight equipment.  It also comes in blue or green.  Your Go Lite 35 pack is an excellent choice, and it will last and last.  The idea behind the 35 liter size is to just carry less.  You won't need to carry more than that on 1-2 night trips.

Tent - Eureka Solitare 1 person tent costs $68.94, weighs 2 lb, 9 oz @ Amazon.com.  You may find this for even less if you search online.  Use the included poles and stakes.
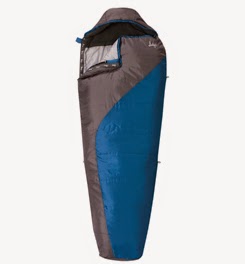
Bag - Slumberjack Lone Pine 40 degree sleeping bag costs $59.98, weighs 2 lb, 4oz @ Campmor.com. More than warm enough for most summer camping, add a sleeping bag liner for more warmth.

The Second Big Three includes sleeping pad, cook stove & gear, and water filtration.
Pad - Thermarest Trail Scout inflatable pad (full size) costs $39.98, weighs 1 lb, 11 oz @ Campmor.com.  You need protection from the ground's cold and some padding to sleep comfortably.

Cook gear - Esbit stove/cook set costs $22.95, weighs only 7 oz @ Amazon.com.  Any plastic spoon and lightweight cup will do for the rest of your cook kit.

Water filtration - Sawyer Mini Filter costs $24.95, weighs only 2oz @ REI.com.  This is all the water filter you will ever need and your water won't taste like chemicals.  Use chemicals as a backup.

This gets you to $307, more or less and weighs about 8 pounds and includes the same type of items as were listed in the article.  That 8 pounds would also be called your base weight, before food, fuel & water are weighed.
Extra items that not mentioned in the article, but are things you would still need...
Fuel - Esbit Tabs 12 pack is $7.99 ( need 2-3 for overnight trip @ 1oz each)  @ Amazon.com.  Add this to the food, water & fuel weight.

First Aid kit - Adventure Medical Kit .5 is $16.95, weighs 10 oz @ REI.com.  Learn to use everything inside the kit.  And it is waterproof!

Rain -  Outdoor Products Multi-purpose Poncho is $30, weighs 12 oz @ REI.com.  Works fine unless it is windy, and it gives you something to sit on during breaks.

Water bottles - Gatorade 32 oz, empty & rinse 2 of these, and once you drink the Gatorade, they are free. Thanks for keeping them out of the landfill.  I keep a couple of spare lids at home in case I lose a lid.

Those add up to $55 and another 2 pounds for a total of about $359 and a total of 10 pounds base weight.
And I have nothing against Outside magazine, I read them often.  I used to purchase those same heavily built packs and shred my feet with those same hard leather boots, but no more.  Instead of the 40+ pound non-ultralight gear mentioned in their article, you can cut that weight in half for about the same price.  Food, fuel & water will weigh around 6-8 pounds more.  Make sure you bring a lighter, matches, flashlight, trash bags (water-proofing), a sweater and soap.  This brings your base weight to about 10 pounds.
Total weight for the Ultralight pack with food, fuel, water & all your stuff is under 20 lbs.  Again, that is less than HALF the weight the magazine article is suggesting that you carry.  Your new pack will carry easily on your back, your knees won't hurt and your feet will be light on the trail.  You will move quicker and not be as tired at the end of the day.  You will be happier, trust me.
A little more searching online may lead you to even better deals.  If you want to go on a backpacking trip in the shoulder seasons (spring/fall), add a sleeping bag liner, long underwear, and polar fleece outerwear, hat & gloves to keep warm.

Beyond the $350 amount, I suggest you invest in a pair of trail running shoes like the Montrail Mountain Masochist II  at $71.51, 2 lb, at  Amazon.  They work great for me, grip the ground awesomely, and at a pound each are very light weight.  You can also wear them for other things than backpacking.  Boots are such overkill.  They are heavy and they shred your feet.  With such a light load on your back (it weighs like most day packs), boots are no longer required.
For food, plan on keeping it simple: mac & cheese & a very small can of chicken that can be freezer bag cooked, an apple, fig bars, breakfast bars, PB&J, trail mix, coffee/tea, etc.  Or eat before you leave the trail head and don't cook dinner the first night out.  Once you get into this, you can create all kinds of wonderful and tasty meals at home to enjoy on the trail.
And wear no cotton clothing - what you already own that is synthetic material will work great, you don't really need hiking-specific clothing.  I wear a synthetic sports t-shirt, thin socks, compression underwear, with nylon pants, and a long sleeve fishing shirt.  With the pants & shirt both being nylon, they dry quickly and block some wind and sun.  And wear a hat.  In Florida I wear a lightweight hat with a wide brim with vents all around.
A hiking stick is always a good idea, and a lightweight wooden one is fine - you can always get collapsible hiking poles later if you still need them.
The other things you need are some basic outdoor skills and a positive mindset.  Basic map and compass skills, camping skills, knowing your knots and a knowledge of first aid (all those things that you learned in Boy Scouts).  These items and more are covered in the Free Ultralight Backpacking E-Book available at Lite Packer Lifestyle on Facebook.  Or search for Ultralight Backpacking how to books on Amazon.  Remember, knowledge weighs nothing!
In between trips, read lots of ultralight blogs for cool DIY weight-saving ideas.  Shop online sales for shoulder season polar fleece and down clothing.  Convince your friends to go camping with you.  Go backpacking 1-2 weekends a month.  Join the Florida Trail, the Sierra Club or any local backpacking group that actually gets out there.  Challenge yourself at least once a year on a multiple day hiking trail far away from home, a kayak or canoe river camping trip or even on a loaded bicycle tour, all using Ultralight weight camping gear.
Dream of backpacking the AT and the PCT.  Pack light, go far, very far.

Friday, April 11, 2014

Lake Apopka Loop Trail


Lake Apopka Trailhead Kiosk
As I listen to the rain tinkle down today, I am reminded of past bicycle loop rides around Lake Apopka, back before the state got serious about water quality and restoring past mistakes.  Those bike rides started from my home then in Apopka, led me on my various road bicycles south along the eastern shore of the lake to the mostly abandoned Winter Garden downtown, with all the vultures perched on the telephone tower.  I would Tour through open country to turn west past Oakland, rolling up and down through the hills of Monte Verde, climbing the wall of Sugarloaf Mountain to turn right to Astatula in the north, and cycle back easterly through the Zellwood area farmlands and Apopka fern fields to return home again.  It was something around a 70 mile ride, crossed a busy highway twice and it took most of the day.  One day it turned cold and rained, but I still rode, a dedicated voyager back then, but not so much now.  I won't ride in the rain anymore unless caught out in it with no where to go.  I like how things have changed.
Lake Apopka, large and looming along your left as you bicycle west.
Crushed cement and gravel trail surface
Today the state of Florida has embraced rail trails and hiking trails and all things outdoors, and have remodeled buildings and opened businesses as the bicyclists and walkers, runners and skaters came and spent a little money on coffee, pizza and antiques.  Whole towns have become great places to live again, and have grown like the downtown area of Winter Garden along the West Orange Trail.  And I noticed the great lake of Apopka is no longer looking 'electric green' and heavily contaminated with nutrients as it did 25 years ago.  Nearly fifteen years into this reclamation and all the work done and all the money spent is beginning to show for the better.
Anhingas resting on poles and posts along the water
Reeds in close and grasses out far along the shoreline
What better way to celebrate area restoration than to bicycle the Lake Apopka Loop trail, along the northern shore of the Lake.  It was supposed to rain, but didn't.  Overcast and windy, it made for a good day outdoors and a challenging ride back into the wind along the open shore.  Now this is not a smooth paved trail, but it is hardened like a gravel road, perfect for wider tires with lower pressures and slower speeds to enjoy the views.  You do start on black pavement at the Magnolia Park trailhead, but after a quarter mile, that changes to crushed cement and gravel.
Old steel supports, well-marked, but be careful bicycling!
Osprey waiting for lunch
The trail follows the top of a dike built around the northern side of the lake in the 1930's-1940's.  This dike allowed the farmers to pump Lake Apopka water onto the muck lands where they truck-farmed for decades, and pump it back out again as the plants matured, creating the fine white Zellwood corn, carrots, lettuce and other farm vegetables for market.  The system was engineered to use labor to cut the produce, toss it up to workers on a shaded platform truck driving slowly behind them who processed and loaded the vegetables into packing cartons, that were conveyor-belted off the back of these slow moving trucks into other refrigerator trucks backing behind them, which then hauled fresh vegetables straight to the freezer warehouse all within 30 minutes of being picked. From there it was distributed directly to stores around the country.  This was American mechanized truck-farm ingenuity at its best.
The problem was that the pesticides and nutrients added to the muck to nourish and protect the food washed back into Lake Apopka with each man-made flood.  Lake Apopka is the head waters for the Ocklawaha River system which feeds into the St. John river and out to the sea at Jacksonville. Contaminates and high levels of nutrients killed the trophy bass fishing businesses on Lake Apopka and ran downstream through the Lake Harris chain to kill fish, birds and wildlife in the St. John river.  This river is also where a lot of Florida's community drinking water comes from, hence the reason for the farmland restoration.
Presently you come to the historic pump house.  It's 3 kerosene pumps are still in place along with huge rusted pipes.  There is a new picnic shelter there with 2 tables, trail brochures and lots to look at both water-side and trail-side.  A raised path has been built around the lake side of the block pump house, and there is a portable toilet on the west side by the ponds and canals.
Along the windy lake shore
Historic Pump House

Big pipes!
Farming culture kiosk
Looking east past the new picnic shelter
Today the farms are all silently gone, the land bought by the St. John Water Management group, but the canals, pumps, roads, bridges and dikes, and a lot of rusted steel remain. The first 4 miles of the trail are open to the lake, providing awesome views across the empty water.  The Monte Verde hills loom above the lake's western shore, water towers and radio towers mark Winter Garden to the south.  Fallow fields to the right seem to flatly go on forever, with a network of dirt roads and old bridges over canals.
About 3 miles further west, you turn inland along a canal, then turn left twice quickly to return back to the shoreline, inside of a line of trees.  Another mile brings you to a picnic table at 8.7 miles, which was my lunch stop and turn around for today.  I believe this is my first-ever stop in a 'new' picnic shelter along a trail that had no trash, no grafitti spray painted anywhere, and had nothing broken.  Even the picnic tables have no carvings in them.  Please, let's keep it this way!
It overlooks a couple of canals and miles and miles of flat land.  Ducks paddled about, hawks and buzzards lofted above, and it was very peaceful.  A Bald Eagle perched on an old power line pole along the way back, then took to the sky with a mate.  I saw a Red-tailed Hawk swooping low along the old fields.  A Blue Heron repeatedly flew a few yards in front of me, then flew again to another branch.  Great Egrets flew in the winds above with an occasional Swallow-tailed Kite.
Nice, new covered picnic area, my bicycle, and more canals
Low and flat farmlands, marsh and more canals
A sign at the picnic shelter & others posted along the trail each half mile
And birds are everywhere.  Anhinga's and Comorants dry their wings on trees and perch on sticks along the shore, Turkey Vultures circle on thermals overhead, Great Blue Heron's take to wing as you approach, Red-winged Blackbirds and Ospreys share tree branches together.  That loud and continuous birdsong that sounds like the Everglade's rookeries was heard along the first section of trail.  I counted 12 of the 18 birds listed in the Orange County Loop Trail handout, and those were just the ones I could identify.  There were many small warblers and yellow colored small birds, cardinals and jays that not on the list.  This is truly a bird-watcher's heaven.  Bring your binoculars!
Well signed trail
Note there are 2 Ospreys and one Red-winged Blackbird sharing a tree
Continuing along the trail you pass wildlife, mostly in the forms of alligators.  Signs are posted everywhere to not feed alligators, so please do not dangle your bicycling partner in front of the 80 tooth monsters as they will bite.  I have read online to stay 15 feet or more away from these beasts, as that is their comfort range (IF they are not hungry or mating March through June).  I usually give them 30 feet or more. Unfortunately this trail passes less than that away from many of these wild animals along the route.  This day, 2 ten-foot-plus ones were sunning themselves just 8 feet off the trail.  Also, don't provoke them to move off the trail if they are blocking it, it may be the last we hear of you.
Do Not Feed Alligator signs are everywhere
Alligator eyeing ducks
Look closely, alligator swimming
Beside the trail, keep 15 feet or more away!
There were also hair-infused animal droppings along the trail, suspected the be from Barn Owls, which I did not see.  There is no one to pick up waste after them.
There is not much, if any at all, shade along this trail, so wear sunscreen and drink lots of water.  Fill up your water bottles at home or at Lake Magnolia Park, there is no drinking water available once you are on the trail.  I drank 2 water bottles on a 3 hour trip in cool, cloudy, windy weather, bring more when it is sunny.
A Bald Eagle waiting for it's mate on an old power pole.
Nearing Magnolia Park on the return ride, and trees are a welcome relief from the wind
Of the entire 14.6 trail miles, I will return to ride the remaining west shore miles along the Apopka-Beauclair canal to the picnic shelter where I lunched on this trip.  Then on another trip I will follow the trails and climb the 4 wildlife viewing towers along the Clay Island loop trails.  The map shows a proposed trail to highway 455 out of Monte Verde, which when finished will make a nice walk (not sure if these trails are to be bicycled or not).  I also want to explore this area and learn more about it before the heat and mosquitoes of summer make it difficult to enjoy being outdoors.
There was really only silence to replace the sounds of farming that once rang out here daily.  I like how things have changed.

Friday, April 4, 2014

Ultralight Deodorant?

"And why would you want to use deodorant when Ultralight Backpacking" you may ask?  To smell better, I answer with a smile.
The problem is that I have an extremely sensitive nose and I really don't enjoy smelling myself or anyone else after a good day's hike, much less on an extended journey.  I'd rather smell the rich wonders of nature all around me.
Now when backpacking, I can't help how someone else smells.  However, I am around myself all of the time and I can change how I smell.  I already use handy wipes to clean my body nightly, before sleeping.  Now I can add a swipe of deodorant under my arms, and no one will smell me coming all day.  (I use unscented deodorant, you should too when backpacking!  Think bears.)
Here's how I do it and keep it ultralight weight.
Pocket-size 3-Pack.
When I purchased the 3 pocket-sized push-up containers of Body Glide Anti-chafe, I found I only needed one of them in my pack at a time.  These pocket-size units only weigh 6 grams/0.2 ounces when full.  I took one of the Body Glide containers I had already used the contents from, removed the label and melted small chunks of deodorant into it, just like I do when salvaging the remaining Body Glide from the bottom of the applicators.
Now, I have an ultralight stick of deodorant for backpacking.
Finished product, pushed up to use.  Of course, I keep the cap on when packed.
Call me whatever, but I have learned to never throw anything out that is still useful that I have space to keep.  For an example, I melted enough Body Glide from the bottom of 5 used containers to last me almost a month of applications, and I use it daily.  That saved me from buying a new Body Glide stick that month.
Peeling off the label.
Here's the steps:
1.  Empty the pocket-sized container, push the base down against the bottom to allow for filling to the top with deodorant.
Cut & chopped deodorant.  Empty & pushed down to the bottom container.
2.  Cut leftover, new or unused deodorant into small chunks with a knife, using either a new stick, or scrape and pick the remains from the bottom piece of an old stick.  I use a paper towel to keep the mess under control as this stuff is waxy and sticky.
3.  Place the empty Body Glide container into a small plastic bowl in the microwave oven.  Paper bowls do burn.
Added chunks, ready to heat.
4.  Add in those small chunks of deodorant, but do not over fill.
Stay with this, it just takes 6-8 bursts to melt the deodorant.
5.  Heat in small bursts of 10-15 seconds, on full power, until the solution is liquid.  Add more chunks slowly and continue to heat in bursts, until the push-up container is full to the top.  Earn extra points if it is smooth.  You must stay with this and watch it work.  Absolutely do NOT turn on high for a few minutes and walk away!
Molten deodorant, note the scorched paper plate.
6.  Allow the mixture to cool inside the microwave.  Removing the still-molten deodorant is a recipe for a messy spill.  I have experience with this.
7.  Remove when solid and cool in the refrigerator for half an hour.
8.  Pack with your personal items, push-up to use and apply nightly when backpacking. Keep lidded otherwise.  Label if it helps you.  When it gets low, make another batch.  For through-hikes, I would just buy a regular small container of deodorant and suffer the slight weight penalty.
Not too difficult?
My total weight for this Ultralight stick of deodorant is a mere 8 grams or 0.3 ounces.
While I didn't write this blog expecting to get everyone to use deodorant when backpacking outdoors, I think the people who are already carrying a heavier deodorant stick may appreciate a DIY option on making a lighter weight deodorant stick for those quick, overnight trips.  It only cost me some time plus the things I that already use.  I got to 'experiment in the lab' while making this, and it makes me feel better and smell good, in an unscented way. 
The good news is, you won't smell me coming down the trail!